Open topic with navigation
You are here: Funding > Viewing Transaction History
Viewing Transaction History
The Transaction History page lets you view information about cash deposits, cash withdrawals, inbound and outbound position transfers and internal transfers for your account or for a client or sub account that you manage.
On the Transaction History page, you can:
- View summary information about your transactions, and adjust the time period for which you want to view transactions from the past 10 days to the past 90 days using a slider.
- Search for any transaction by Account ID, transaction type or transaction method.
- Sort the list of transactions by any column.
- View additional details about each transaction in a popup window.
- Cancel a transaction from the details popup window.
- Modify a pending deposit notification.
- Elect to stop payment on a check withdrawal.
- Export the transaction history to Microsoft Excel.
- Print the transaction history.
 Who can access the Transaction History page?
You can access this page if you are a(n):
- Individual, Joint, Trust or IRA Account User
- Small Business Account User
- Friends and Family Group Master or Client User
- Advisor Master User Individual
- Advisor Master User Organization
- Advisor Client User Individual
- Advisor Client User Organization
- Proprietary Trading Group Master User
- Broker Master User (master account only)
- Broker Fully Disclosed Client User
- Broker Fully Disclosed Client User Organization
- Investment Manager Master User
- Fund
Click the following links to see complete descriptions of the fields displayed in the details popup window for each type of transaction.
To view summary information about your transactions
- Click Funding > Transaction History.
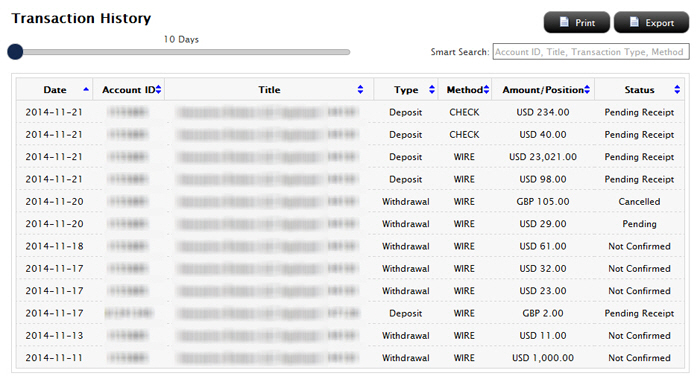
- By default, the Transaction History page shows all of your funding transactions for the past ten days. You can adjust that up to the past 90 days by adjusting the time slider. Click and drag the ball on the slider right or left with your mouse to change the time. The page updates to display all of your funding transactions for the selected period.


- By default, transactions are displayed by date in descending order. Change the sort order by clicking any column heading. To change the sort order from descending to ascending, click the column heading again.
For example, if you want to view all deposits listed together, click the Type column heading.
- Search for a specific transaction by Account ID, Account Title, Transaction Type (deposit, withdrawal, etc.) or Transaction Method (check, wire, etc.) by typing the search criteria in the Smart Search field. The Smart Search starts searching as soon as you begin typing (you do not have to type an entire ID or word). Search words are not case sensitive.

- View additional details about any transaction by clicking the transaction row. Transaction details appear in a popup window.
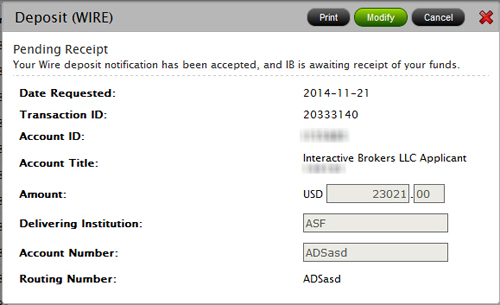
- From the transaction detail popup window, perform any of the following optional operations:
- Print the transaction details by clicking Print button.
- Cancel any transaction that has a status of Pending or Not Confirmed.
- In some cases, you may need to modify a deposit notification before any funds have actually been moved. You can modify any check or wire deposit notification that you have already submitted and have a status of Pending. For example, you might submit a deposit notification for a wire deposit, but then realize that you typed the wrong amount.
- Stop payment on a check withdrawal
Close the popup window by clicking the red X icon in the upper corner.
Note: DO NOT CLICK THE CANCEL BUTTON AS THAT WILL CANCEL THE TRANSACTION.
To cancel a transaction
- Find the funding transaction that you want to cancel. If necessary, re-sort the columns or use the smart search to find the transaction.
- Click the transaction to open the details popup window.
For example, here are the details of a pending wire withdrawal.
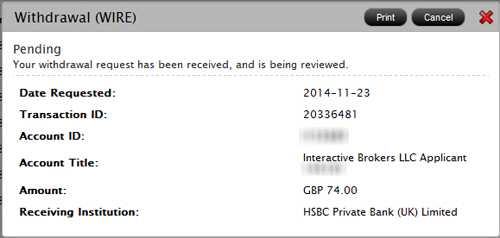
- Click the Cancel button. Do not click the red X icon as that only closes the popup window.
- Click OK when prompted to confirm your cancel request.
- Click the red X icon to close the popup window. Note that the status of the transaction on the Transaction History page has changed to Cancelled.
To modify a deposit notification
Remember, deposit notifications do not actually move your funds. They only notify us of your intention to deposit funds using the deposit method you selected.
- Find the funding transaction that you want to mdify. If necessary, re-sort the columns or use the smart search to find the transaction.
- Click the transaction to open the details popup window.
- Click Modify.Editable fields change to text boxes.
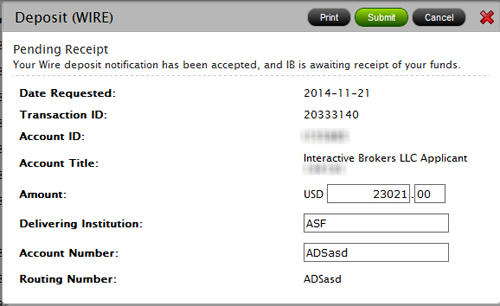
- Modify the information that you need to change, then click Submit.
- Click OK when prompted to confirm your request.
- Click the red X icon to close the popup window.
Request a stop payment of a check withdrawal
You can submit a request to stop payment of a check withdrawal
on the Transaction History page. Stop payment requests are subject to
the following rules:
- Stop
payments can only be requested for check withdrawals.
- You can
request a stop payment for check withdrawals from the last 90 days only.
On the Transaction History page, all check withdrawals from the last 90
days are displayed.
- You cannot
request more than one stop payment for a single check withdrawal.
- The option
to stop payment only appears when a check withdrawal transaction’s status
is Processing.
To request a stop payment of a check withdrawal
- Click any check withdrawal to display the transaction details in a popup window.
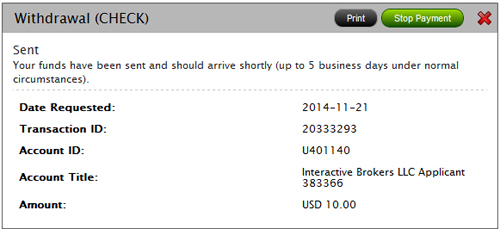
- Click the Stop Payment button.
- A confirmation message appears. Click
OK to continue with your stop
payment request.
- Select a reason for the stop payment,
then click Continue. Available
reasons include:
- Non-receipt
- Incorrect address
- Lost/stolen/damage
- I did not request
- Read the Stop Payment Affidavit, then
type your name in the field provided and click Continue.
This indicates that you are signing the affidavit.
An email containing a confirmation number is sent to you.
- Enter the confirmation number from
the email, then click Continue to
complete the stop payment request process and return to the Transaction History page.
To export the transaction history to Microsoft Excel
Click the Export button located in the upper right section of the page. You are prompted to save or download the .XLS page to your computer (depending on your web browser). Once saved, you can open that file in Microsoft Excel.
To print the transaction history
Click the Print button located in the upper right section of the page. The Transaction History as currently displayed will print.
For more information